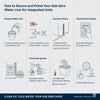
How to Secure and Prime Your Sub-Zero Water Line for Integrated Units
, by ABM Service, 6 min reading time
""Free Shipping on USA"" We do not provide any authorization invoice for amazon Resale.
, by ABM Service, 6 min reading time
A Sub-Zero integrated refrigerator requires a consistent, clean water supply to support reliable ice production and water dispensing. Proper water line installation plays a key role in preventing issues such as leaks, reduced water flow, and irregular ice formation. Careful setup also helps maintain long-term system efficiency and dependable performance. This guide outlines each step in a clear and practical manner to help you complete the installation with accuracy and confidence.
The water line in a Sub-Zero refrigerator moves water from the home supply into the appliance. This line supports both the ice maker and the water dispenser, which depend on steady pressure. Several parts work together, including tubing, fittings, and the shut-off valve. A stable setup keeps water moving without blockage or pressure drops. A weak connection can lead to slow ice production or uneven water flow.
A proper setup starts with the right tools and materials. Basic equipment helps keep the process safe and smooth. Most installations use standard plumbing items that fit refrigerator systems.
Safety gloves also help protect hands during installation. A clean workspace near the water supply line makes the job easier.
Start by setting up a clean and open space behind the unit. Gather basic tools like an adjustable wrench, tubing cutter, and approved water line kit. Turn off the main water supply before any work begins to avoid unwanted water flow. A dry workspace helps you spot issues early during installation.
Connect the water line to the inlet valve designed for your Sub-Zero integrated unit. Tighten each fitting with steady pressure so the connection stays firm. Avoid over-tightening because it can damage the threads or tubing. Keep the tubing straight and avoid sharp bends that may block water flow or reduce pressure.
Place the water line in a safe position behind the refrigerator. Leave enough space so the unit can move slightly during installation or service without stressing the line. Use clips or straps to hold the tubing in place so it does not shift over time. A stable setup helps prevent loose fittings and reduces the chance of leaks later.
Slowly open the main water valve after all connections are complete. This gradual flow helps reduce pressure shock on the fittings. Watch the connection points as water enters the system. Small changes in pressure can reveal weak spots early.
Check all joints, valves, and tubing connections closely. Look for moisture, slow dripping, or wet spots around fittings. Tighten any loose connection if needed, but avoid forcing parts beyond normal tension. A leak-free system supports steady water flow and protects your kitchen from damage.
Air trapped inside the water line can disrupt normal water flow. This often leads to sputtering from the dispenser and uneven ice production. A properly primed system helps water move smoothly through the line. It also supports steady performance from the first use.
Run water through the dispenser for several minutes after installation. Continue until the flow becomes steady without bursts of air. Discard the first few gallons to clear out air and installation residue. This step also helps prepare clean water for daily use.
Flush the system fully so any trapped air and small particles leave the line. Clean water should flow evenly before the ice maker starts working. This step supports better taste and cleaner ice production. A full flush also helps protect internal components from blockage.
Turn on the ice maker after the system fills with water. Allow it to complete one full cycle before regular use. Discard the first batch of ice since it may contain residue from installation. This simple step helps maintain clean ice quality.
Check water flow from the dispenser for steady pressure. Confirm that ice production starts within the expected time frame. Listen for unusual sounds that may signal air or pressure issues. Smooth operation shows that the system is ready for daily use.
Water flow problems often appear when small setup issues go unnoticed. A few simple checks can prevent most of these issues from the start.
Low water pressure can reduce ice production and slow dispenser output. A clear line without bends supports steady performance across all functions.
Water dispenser issues often connect to air pockets, pressure loss, or loose fittings. A slow flow usually points to a blocked filter or a kink in the tubing. Ice maker problems often link to low water supply or trapped air in the line. Small adjustments can often restore normal function without major repair work.
Leaks around connection points often come from loose fittings or worn tubing. Tightening connections or replacing damaged parts usually fixes the issue. Persistent flow problems may need a full check of the water line path. Careful inspection helps restore stable operation and prevents future disruption.
Regular care keeps the water system stable over time. Checking connections every few months helps catch small leaks early. A clean filter supports steady water flow and better ice quality. The water line should stay free from sharp bends or pressure points behind the unit. Consistent care reduces the chance of sudden performance drops.
A properly secured and primed water line helps your Sub-Zero integrated unit work with steady water flow and reliable ice production. Careful connection, leak checks, and full priming support long-term system health. Regular inspection of tubing, filters, and fittings keeps performance consistent over time. A well-set water line setup reduces common issues and supports smooth daily use.


